
How to Play Vibrato on the Recorder and other Wind Instruments
Air Vibrato and Finger Vibrato (Flattement)
Adapted from my article in American Recorder, Vol. LXIII, No. 3 (Fall 2022)
When we think of vibrato today, we often imagine it as a constant part of a musician’s sound. But for the recorder, history tells a different story: vibrato was used as an ornament, not the default. In this article, we’ll look at what the sources say, and how we can apply vibrato on our instrument with both air and fingers.
Vibrato in Context
Since the 1970s, the general view has been that vibrato is not a continuous sound quality for the recorder, even though we also play modern repertoire. Historical descriptions are clear: vibrato was considered an ornament. Michael Lynn, in his ARS article on flattement, reminds us that historical treatises mention only finger vibrato for wind instruments, not air vibrato. Still, because instruments were seen as imitating the voice, I believe there is also a place for air vibrato.
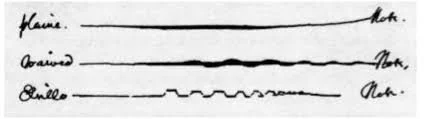
Frederick K. Gable asked whether in the Baroque, the natural vocal vibrato might have been mainly an intensity vibrato (more/less air), while the ornamental vibrato was a pitch vibrato (like a trill). Roger North’s 1695 writings support this, describing the difference between a “waived” intensity vibrato and a trill-like pitch vibrato.
This gives us two directions for recorder vibrato: air vibrato and finger vibrato (flattement).
Air Vibrato
Air vibrato is not throat vibrato. Throat vibrato tenses the throat and quickly becomes a stubborn habit. What we want is a relaxed, controlled wave in the air stream.
Start with a perfectly smooth long note—this is your foundation. Then add gentle waves by alternating faster and slower air: never stopping the stream, always keeping it flowing.
Exercises (without instrument):
Regular waves: faster, slower, faster, slower.
Slow → fast: gradually speed up.
Fast → slow: gradually slow down.
Slow–fast–slow.
Fast–slow–fast.
Keep the throat open and relaxed. If you feel tension, yawn, or inhale with an “ah/oh” shape to reset.
With the recorder: Repeat the same sequence, listening carefully. Keep posture free, don’t force the speed, and let progress come naturally. Air vibrato is excellent as part of a warm-up and a subtle way to add expression.
Finger Vibrato (Flattement)
Flattement works like a soft trill at the edge of a hole. Instead of covering and uncovering fully, you gently shade the hole, creating a pulsing effect.
Play an E on the alto and caress the edge of hole 2. Because the average pitch lowers, you need to blow slightly more—so flattement always pairs with a mini crescendo and decrescendo.
Think of it as organic: it starts slowly, quickens a little, but never becomes uncontrolled. Unlike a trill (which resolves with the finger down), flattement ends with the finger lifted again.
Which hole? It depends. For some notes, you use the next hole; for others, you skip one or two. The further the hole, the more you can shade. For E, holes 4–5 can also work. For D, you might try holes 4–5 together. Each pitch has its own solutions—you need to experiment.
In French Baroque music, flattement is the vibrato of choice, especially on long notes or dissonances against the continuo, where it enhances intensity and color.
Final Thought
Whether you use air vibrato or flattement, the key is awareness. Listen with your ears and your body: notice how it feels, what changes in your breath, fingers, posture. The more conscious you are, the more easily your brain builds the right muscle memory.
Vibrato on the recorder is not about a constant sound quality, but about an ornament. Used with care, it adds expression and color to the musical line.